flutter 架构及框架结构 (一)

第一篇

这是写关于 flutter 的第一篇文章。关于 flutter 的基础介绍不会太多,更注重的是 flutter 的整体架构,以及 flutter 的 dart 侧框架设计。

基本介绍

这里说几个特点(更多详情可参考 flutter 中文):

  1. 跨平台自绘引擎
  2. 高性能

flutter 框架结构

flutter
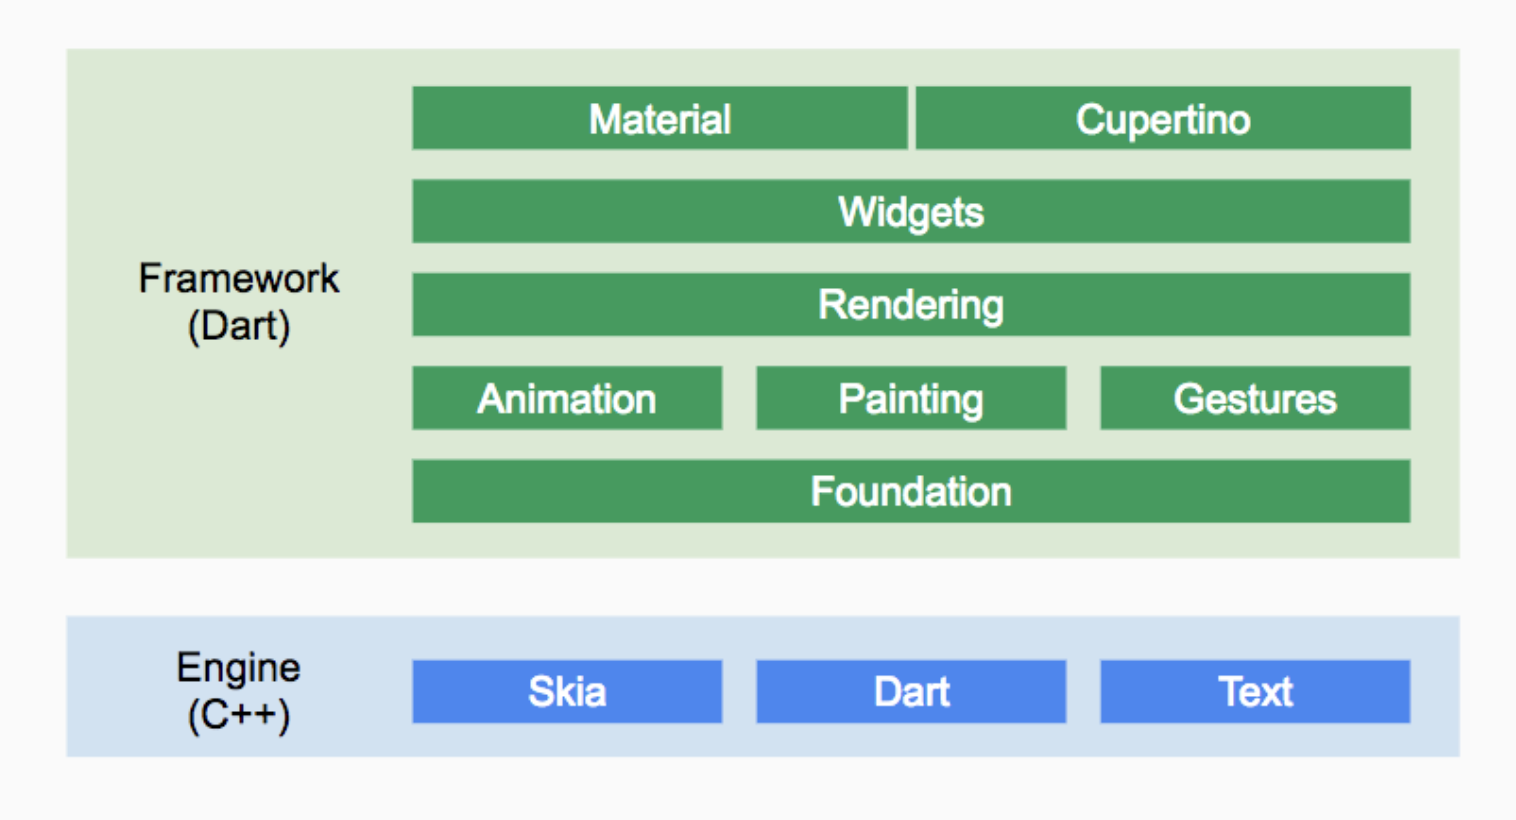
flutter 设计主要分为两块:一块是 dart 侧的框架实现,包含一些 Widget、RenderObject、Paint、Gesture、Animation 等的具体实现;另一块是跨平台的绘制系统。目前 flutter 支持 iOS、Android、windows 桌面端、MacOS 桌面端、Linux 桌面端、Fushion 系统、Web 等。可谓是跨终端大杀器

下面进入本文主题……

启动 app 的流程

这里讲解 flutter 如何启动绘制。当然,只从 dart 侧代码开始入手,native 侧目前不太清楚。
入口:

1
2
3
void main() {
runApp(MyApp());
}

进入 runApp 方法,看到:

1
2
3
4
5
void runApp(Widget app) {
WidgetsFlutterBinding.ensureInitialized()
..attachRootWidget(app)
..scheduleWarmUpFrame();
}

参数 app 是一个 Widget,它是 Flutter 应用启动后要展示的第一个 Widget,一般使用 MaterialApp 包裹的组件。而 WidgetsFlutterBinding 正是绑定 Widget 框架和 Flutter engine 的桥梁,定义如下:

1
2
3
4
5
6
7
class WidgetsFlutterBinding extends BindingBase with GestureBinding, ServicesBinding, SchedulerBinding, PaintingBinding, SemanticsBinding, RendererBinding, WidgetsBinding {
static WidgetsBinding ensureInitialized() {
if (WidgetsBinding.instance == null)
WidgetsFlutterBinding();
return WidgetsBinding.instance;
}
}

可以看到 WidgetsFlutterBinding 继承自 BindingBase 并混入了很多 Binding,在介绍这些 Binding 之前先介绍一下 Window 这个类。下面是 Window 的官方解释:

The most basic interface to the host operating system’s user interface.

很明显,Window 正是 Flutter Framework 连接宿主操作系统的接口。我们看一下 Window 类的部分定义:

1
2
3
4
5
6
7
8
9
10
11
12
13
14
15
16
17
18
19
20
21
22
23
24
25
26
27
28
29
30
31
32
33
34
35
36
37
38
class Window {
// 当前设备的DPI,即一个逻辑像素显示多少物理像素,数字越大,显示效果就越精细保真。
// DPI是设备屏幕的固件属性,如Nexus 6的屏幕DPI为3.5
double get devicePixelRatio => _devicePixelRatio;
// Flutter UI绘制区域的大小
Size get physicalSize => _physicalSize;
// 当前系统默认的语言Locale
Locale get locale;
// 当前系统字体缩放比例。
double get textScaleFactor => _textScaleFactor;
// 当绘制区域大小改变回调
VoidCallback get onMetricsChanged => _onMetricsChanged;
// Locale发生变化回调
VoidCallback get onLocaleChanged => _onLocaleChanged;
// 系统字体缩放变化回调
VoidCallback get onTextScaleFactorChanged => _onTextScaleFactorChanged;
// 绘制前回调,一般会受显示器的垂直同步信号VSync驱动,当屏幕刷新时就会被调用
FrameCallback get onBeginFrame => _onBeginFrame;
// 绘制回调
VoidCallback get onDrawFrame => _onDrawFrame;
// 点击或指针事件回调
PointerDataPacketCallback get onPointerDataPacket => _onPointerDataPacket;
// 调度Frame,该方法执行后,onBeginFrame和onDrawFrame将紧接着会在合适时机被调用,
// 此方法会直接调用Flutter engine的Window_scheduleFrame方法
void scheduleFrame() native 'Window_scheduleFrame';
// 更新应用在GPU上的渲染,此方法会直接调用Flutter engine的Window_render方法
void render(Scene scene) native 'Window_render';
// 发送平台消息
void sendPlatformMessage(
String name,
ByteData data,
PlatformMessageResponseCallback callback,
);
// 平台通道消息处理回调
PlatformMessageCallback get onPlatformMessage => _onPlatformMessage;
// ...其它属性及回调

}

可以看到 Window 类包含了当前设备和系统的一些信息以及 Flutter Engine 的一些回调。现在我们再回来看看 WidgetsFlutterBinding 混入的各种 Binding。通过查看这些 Binding 的源码,我们可以发现这些 Binding 中基本都是监听并处理 Window 对象的一些事件,然后将这些事件按照 Framework 的模型包装、抽象然后分发。可以看到 WidgetsFlutterBinding 正是粘连 Flutter engine 与上层 Framework 的 “胶水”。下面具体说一下各个 Binding 的作用:

  • GestureBinding:提供了 window.onPointerDataPacket 回调,绑定 Framework 手势子系统,是 Framework 事件模型与底层事件的绑定入口。
  • ServicesBinding:提供了 window.onPlatformMessage 回调, 用于绑定平台消息通道(message channel),主要处理原生和 Flutter 通信。
  • SchedulerBinding:提供了 window.onBeginFrame 和 window.onDrawFrame 回调,监听刷新事件,绑定 Framework 绘制调度子系统。
  • PaintingBinding:绑定绘制库,主要用于处理图片缓存。
  • SemanticsBinding:语义化层与 Flutter engine 的桥梁,主要是辅助功能的底层支持。
  • RendererBinding: 提供了 window.onMetricsChanged、window.onTextScaleFactorChanged 等回调。它是渲染树与 Flutter engine 的桥梁。
  • WidgetsBinding:提供了 window.onLocaleChanged、onBuildScheduled 等回调。它是 Flutter widget 层与 engine 的桥梁。

查看抽象类 BindingBase ,构造函数中:

1
2
3
4
BindingBase() {
initInstances();
initServiceExtensions();
}

即要求子类选择实现 initInstances、initServiceExtensions 这两个方法。这两个方法有什么用呢?查看注释,发现它主要用于子类绑定与平台相关的 hook,并且配置对应的服务(但不是每个子类都必须重写这两个)。我们简单拿 WidgetsBinding 来看一下怎么实现的这两个方法:

1
2
3
4
5
6
7
8
9
10
11
12
13
14
15
16
17
18
19
20
21
22
23
24
25
26
27
28
29
30
31
32
33
34
35
void initInstances() {
super.initInstances();
_instance = this;
buildOwner.onBuildScheduled = _handleBuildScheduled;
window.onLocaleChanged = handleLocaleChanged;
window.onAccessibilityFeaturesChanged = handleAccessibilityFeaturesChanged;
SystemChannels.navigation.setMethodCallHandler(_handleNavigationInvocation);
SystemChannels.system.setMessageHandler(_handleSystemMessage);
}

void initServiceExtensions() {
super.initServiceExtensions();
if (!kReleaseMode) {
registerSignalServiceExtension(
name: 'debugDumpApp',
callback: () {
debugDumpApp();
return debugPrintDone;
},
);

registerBoolServiceExtension(
name: 'showPerformanceOverlay',
getter: () =>
Future<bool>.value(WidgetsApp.showPerformanceOverlayOverride),
setter: (bool value) {
if (WidgetsApp.showPerformanceOverlayOverride == value)
return Future<void>.value();
WidgetsApp.showPerformanceOverlayOverride = value;
return _forceRebuild();
},
);
}
// ...
}

我们发现,对于 WidgetsBinding 这个 Binding 来说,它重写了两个方法。initInstances 中在 windows 上设置了两个回调(上面说了 windows 是当前平台与 flutter 引擎相关的)。在 SystemChannels.navigation 上绑定了路由事件,在 SystemChannels.system 绑定了低内存事件。在 initServiceExtensions 方法中,注册了许多服务扩展,比如:debugDumpApp,这个就类似在 flutter run 时打印当前树信息等,showPerformanceOverlay 这个就是调试时是否开启 PerformanceOverlay 面板等。

WidgetsFlutterBinding.ensureInitialized () 负责初始化一个 WidgetsBinding 的全局单例,接着会调用 WidgetsBinding 的 attachRootWidget 方法,该方法负责将根 Widget 添加到 RenderView 上,代码如下:

1
2
3
4
5
6
7
void attachRootWidget(Widget rootWidget) {
_renderViewElement = RenderObjectToWidgetAdapter<RenderBox>( // #RenderObjectToWidgetAdapter
container: renderView,
debugShortDescription: '[root]',
child: rootWidget,
).attachToRenderTree(buildOwner, renderViewElement);
}

首先来看一下什么是 RenderView:

1
2
3
4
5
6
7
8
9
10
11
12
13
14
15
16
17
18
19
20
21
22
23
24
25
26
27
28
29
30
31
32
33
34
35
36
/// The root of the render tree.
///
/// The view represents the total output surface of the render tree and handles
/// bootstrapping the rendering pipeline. The view has a unique child
/// [RenderBox], which is required to fill the entire output surface.
class RenderView extends RenderObject with RenderObjectWithChildMixin<RenderBox> {
RenderView({
RenderBox child,
@required ViewConfiguration configuration,
@required ui.Window window,
});

@override
void performResize() {}

@override
void performLayout() {}

@override
void paint(PaintingContext context, Offset offset) {}

@override
void applyPaintTransform(RenderBox child, Matrix4 transform) {}

/// Bootstrap the rendering pipeline by scheduling the first frame.
///
/// This should only be called once, and must be called before changing
/// [configuration]. It is typically called immediately after calling the
/// constructor.
void scheduleInitialFrame() {}

/// Uploads the composited layer tree to the engine.
///
/// Actually causes the output of the rendering pipeline to appear on screen.
void compositeFrame() {}
}

为了学习方便,我贴了它的 class 注释。可以看到,RenderView 是 render tree 的顶级,从继承关系来说,它也是 RenderObject 的顶层元素。按需实现了 RenderObject 的抽象方法 performLayout/performResize/paint 等,同时自定义了 scheduleInitialFrame/compositeFrame 等方法,用于首次渲染及直接合成帧。

那么,renderView 是何时构造的呢?

1
2
3
4
5
6
7
8
9
10
11
12
13
// RenderBinding.dart 中
void initRenderView() {
assert(renderView == null);
renderView = RenderView(configuration: createViewConfiguration(), window: window);
renderView.scheduleInitialFrame(); // #RenderBinding->scheduleInitialFrame
}
ViewConfiguration createViewConfiguration() {
final double devicePixelRatio = window.devicePixelRatio;
return ViewConfiguration(
size: window.physicalSize / devicePixelRatio,
devicePixelRatio: devicePixelRatio,
);
}

就相当于根据当前平台,获取对应屏幕尺寸,然后作为一个 configuration 用于构造 renderView。

构造好了 renderView,马上调用了 scheduleInitialFrame。看一下到底这个做了啥?

1
2
3
4
5
void scheduleInitialFrame() {
scheduleInitialLayout();
scheduleInitialPaint(_updateMatricesAndCreateNewRootLayer());
owner.requestVisualUpdate();
}

其实就是标记当前 renderView 第一次 layout,第一次 paint,再请求 PipelineOwner 更新视图。

1
2
3
4
5
6
7
8
9
// RenderObject.dart
void scheduleInitialLayout() {
_relayoutBoundary = this; // 重绘边界就是当前 renderView
owner._nodesNeedingLayout.add(this); // 让 BuildOwn 的_nodesNeedingLayout队列添加自己
}
void scheduleInitialPaint(ContainerLayer rootLayer) {
_layer = rootLayer;
owner._nodesNeedingPaint.add(this); // 添加
}

好,回到 #RenderObjectToWidgetAdapter 这里。说一下 RenderObjectToWidgetAdapter 的作用:

1
2
3
4
5
6
7
8
9
10
11
12
13
14
15
16
/// A bridge from a [RenderObject] to an [Element] tree.
///
/// The given container is the [RenderObject] that the [Element] tree should be
/// inserted into. It must be a [RenderObject] that implements the
/// [RenderObjectWithChildMixin] protocol. The type argument `T` is the kind of
/// [RenderObject] that the container expects as its child.
///
/// Used by [runApp] to bootstrap applications.
class RenderObjectToWidgetAdapter<T extends RenderObject> extends RenderObjectWidget {
RenderObjectToWidgetAdapter({
this.child,
/// The [RenderObject] that is the parent of the [Element] created by this widget.
this.container,
this.debugShortDescription,
}) : super(key: GlobalObjectKey(container));
}

看注释就够了。说的是,把之前的 renderView 这个 RenderObject 作为该组件 Element 元素的父级。(TODO 后面讨论一下 Widget、Element、RenderObject 之间的关系)

注意,代码中的有 renderView 和 renderViewElement 两个变量,renderView 是一个 RenderObject,它是渲染树的根,而 renderViewElement 是 renderView 对应的 Element 对象,可见该方法主要完成了根 widget 到根 RenderObject 再到根 Element 的关联过程。我们看看 attachToRenderTree 的源码实现:

1
2
3
4
5
6
7
8
9
10
11
12
13
14
15
16
17
18
19
RenderObjectToWidgetElement<T> attachToRenderTree(
BuildOwner owner,
[ RenderObjectToWidgetElement<T> element ]
) {
if (element == null) {
owner.lockState(() {
element = createElement();
assert(element != null);
element.assignOwner(owner);
});
owner.buildScope(element, () {
element.mount(null, null);
});
} else {
element._newWidget = this;
element.markNeedsBuild();
}
return element;
}

该方法负责创建根 element,即 RenderObjectToWidgetElement,并且将 element 与 widget 进行关联,即创建出 widget 树对应的 element 树。如果 element 已经创建过了,则将根 element 中关联的 widget 设为新的,由此可以看出 element 只会创建一次,后面会进行复用。那么 BuildOwner 是什么呢?其实他就是 widget framework 的管理类,它跟踪哪些 widget 需要重新构建。

渲染

回到 runApp 的实现中,当调用完 attachRootWidget 后,最后一行会调用 WidgetsFlutterBinding 实例的 scheduleWarmUpFrame () 方法,该方法的实现在 SchedulerBinding 中,它被调用后会立即进行一次绘制(而不是等待”vsync” 信号),在此次绘制结束前,该方法会锁定事件分发,也就是说在本次绘制结束完成之前 Flutter 将不会响应各种事件,这可以保证在绘制过程中不会再触发新的重绘。下面是 scheduleWarmUpFrame () 方法的部分实现 (省略了无关代码):

1
2
3
4
5
6
7
8
9
10
11
12
13
14
15
16
void scheduleWarmUpFrame() {
// ...
Timer.run(() {
handleBeginFrame(null);
});
Timer.run(() {
handleDrawFrame();
resetEpoch();
});
// 锁定事件
lockEvents(() async {
await endOfFrame;
Timeline.finishSync();
});
// ...
}

可以看到该方法中主要调用了 handleBeginFrame () 和 handleDrawFrame () 两个方法,在看这两个方法之前我们首先了解一下 Frame 和 FrameCallback 的概念:

  • Frame: 一次绘制过程,我们称其为一帧。Flutter engine 受显示器垂直同步信号”VSync” 的驱使不断的触发绘制。我们之前说的 Flutter 可以实现 60fps(Frame Per-Second),就是指一秒钟可以触发 60 次重绘,FPS 值越大,界面就越流畅。
  • FrameCallback:SchedulerBinding 类中有三个 FrameCallback 回调队列, 在一次绘制过程中,这三个回调队列会放在不同时机被执行:
    1. transientCallbacks:用于存放一些临时回调,一般存放动画回调。可以通过 SchedulerBinding.instance.scheduleFrameCallback 添加回调。
    2. persistentCallbacks:用于存放一些持久的回调,不能在此类回调中再请求新的绘制帧,持久回调一经注册则不能移除。SchedulerBinding.instance.addPersitentFrameCallback (),这个回调中处理了布局与绘制工作。
    3. postFrameCallbacks:在 Frame 结束时只会被调用一次,调用后会被系统移除,可由 SchedulerBinding.instance.addPostFrameCallback () 注册,注意,不要在此类回调中再触发新的 Frame,这会导致循环刷新。

现在请读者自行查看 handleBeginFrame () 和 handleDrawFrame () 两个方法的源码,可以发现前者主要是执行了 transientCallbacks 队列,而后者执行了 persistentCallbacks 和 postFrameCallbacks 队列。

绘制

渲染和绘制逻辑在 RendererBinding 中实现,查看其源码,发现在其 initInstances () 方法中有如下代码:

1
2
3
4
5
6
7
8
9
10
11
12
13
void initInstances() {
... //省略无关代码

//监听Window对象的事件
ui.window
..onMetricsChanged = handleMetricsChanged
..onTextScaleFactorChanged = handleTextScaleFactorChanged
..onSemanticsEnabledChanged = _handleSemanticsEnabledChanged
..onSemanticsAction = _handleSemanticsAction;

//添加PersistentFrameCallback
addPersistentFrameCallback(_handlePersistentFrameCallback);
}

我们看最后一行,通过 addPersistentFrameCallback 向 persistentCallbacks 队列添加了一个回调 _handlePersistentFrameCallback:

1
2
3
void _handlePersistentFrameCallback(Duration timeStamp) {
drawFrame();
}

该方法直接调用了 RendererBinding 的 drawFrame () 方法:

1
2
3
4
5
6
7
8
void drawFrame() {
assert(renderView != null);
pipelineOwner.flushLayout(); //布局
pipelineOwner.flushCompositingBits(); //重绘之前的预处理操作,检查RenderObject是否需要重绘
pipelineOwner.flushPaint(); // 重绘
renderView.compositeFrame(); // 将需要绘制的比特数据发给GPU
pipelineOwner.flushSemantics(); // this also sends the semantics to the OS.
}

我们看看这些方法分别做了什么:

flushLayout()

1
2
3
4
5
6
7
8
9
10
11
12
13
void flushLayout() {
// ...
while (_nodesNeedingLayout.isNotEmpty) {
final List<RenderObject> dirtyNodes = _nodesNeedingLayout;
_nodesNeedingLayout = <RenderObject>[];
for (RenderObject node in
dirtyNodes..sort((RenderObject a, RenderObject b) => a.depth - b.depth)) {
if (node._needsLayout && node.owner == this)
node._layoutWithoutResize();
}
}
}
}

源码很简单,该方法主要任务是更新了所有被标记为 “dirty” 的 RenderObject 的布局信息。主要的动作发生在 node._layoutWithoutResize () 方法中,该方法中会调用 performLayout () 进行重新布局。

flushCompositingBits()

1
2
3
4
5
6
7
8
9
10
void flushCompositingBits() {
_nodesNeedingCompositingBitsUpdate.sort(
(RenderObject a, RenderObject b) => a.depth - b.depth
);
for (RenderObject node in _nodesNeedingCompositingBitsUpdate) {
if (node._needsCompositingBitsUpdate && node.owner == this)
node._updateCompositingBits(); //更新RenderObject.needsCompositing属性值
}
_nodesNeedingCompositingBitsUpdate.clear();
}

检查 RenderObject 是否需要重绘,然后更新 RenderObject.needsCompositing 属性,如果该属性值被标记为 true 则需要重绘。

flushPaint()

1
2
3
4
5
6
7
8
9
10
11
12
13
14
15
16
17
18
19
void flushPaint() {
...
try {
final List<RenderObject> dirtyNodes = _nodesNeedingPaint;
_nodesNeedingPaint = <RenderObject>[];
// 反向遍历需要重绘的RenderObject
for (RenderObject node in
dirtyNodes..sort((RenderObject a, RenderObject b) => b.depth - a.depth)) {
if (node._needsPaint && node.owner == this) {
if (node._layer.attached) {
// 真正的绘制逻辑
PaintingContext.repaintCompositedChild(node);
} else {
node._skippedPaintingOnLayer();
}
}
}
}
}

该方法进行了最终的绘制,可以看出它不是重绘了所有 RenderObject,而是只重绘了需要重绘的 RenderObject。真正的绘制是通过 PaintingContext.repaintCompositedChild () 来绘制的,该方法最终会调用 Flutter engine 提供的 Canvas API 来完成绘制。

compositeFrame()

1
2
3
4
5
6
7
8
9
10
11
12
13
void compositeFrame() {
...
try {
final ui.SceneBuilder builder = ui.SceneBuilder();
final ui.Scene scene = layer.buildScene(builder);
if (automaticSystemUiAdjustment)
_updateSystemChrome();
ui.window.render(scene); //调用Flutter engine的渲染API
scene.dispose();
} finally {
Timeline.finishSync();
}
}

这个方法中有一个 Scene 对象,Scene 对象是一个数据结构,保存最终渲染后的像素信息。这个方法将 Canvas 画好的 Scene 传给 window.render () 方法,该方法会直接将 scene 信息发送给 Flutter engine,最终由 engine 将图像画在设备屏幕上。

最后

需要注意的是:由于 RendererBinding 只是一个 mixin,而 with 它的是 WidgetsBinding,所以我们需要看看 WidgetsBinding 中是否重写该方法,查看 WidgetsBinding 的 drawFrame () 方法源码:

1
2
3
4
5
6
7
8
9
10
@override
void drawFrame() {
// ...省略无关代码
try {
if (renderViewElement != null)
buildOwner.buildScope(renderViewElement);
super.drawFrame(); // 调用RendererBinding的drawFrame()方法
buildOwner.finalizeTree();
}
}

我们发现在调用 RendererBinding.drawFrame () 方法前会调用 buildOwner.buildScope () (非首次绘制),该方法会将被标记为 “dirty” 的 element 进行 rebuild () 。

参考

flutter 中文网 - app 启动